
Application Registration
The purpose of this step is to setup a “principal” that can be linked Azure Key Vault.
Application (App) Registration is an Azure process to setup an authentication & authorization process for an application to other Azure objects.
By registering an application (application/app id) and creating a secret (client secret) it can prove its identity – thus, it can be authorize by Azure AD.
Configuration of the API permissions will give the identity, the authority to communicate/transact against an Azure object.
- Sign-in to Azure Portal
- Search or click Azure Active Directory
- Under Manage tab, click App registrations, this will load Register an application dialog.
- Populate/ensure the following:
- Name (1) – unique name for your application.
- Single Tenant (2).
- Redirect Uri (3) – leave the default, for now.
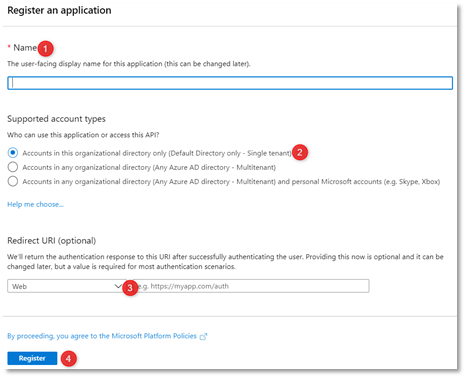
- Click Register.
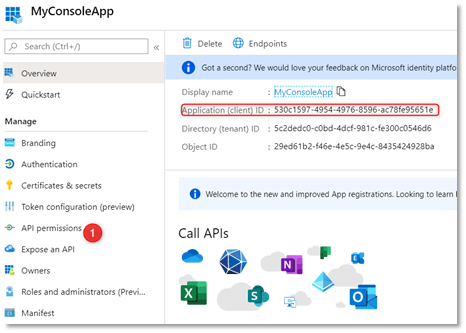
- Take note of the Application (client) ID.
- Click API permissions.
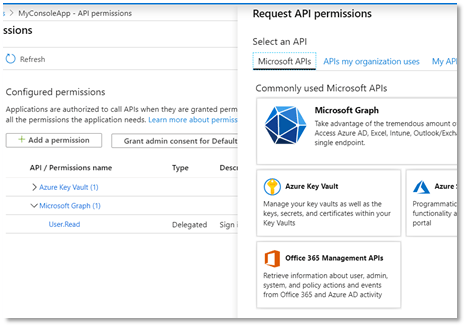
- API permission dialog loads. Click +Add a permission.
- Under Microsoft APIs, select Azure Key Vault.
- Ensure that the checkbox for user_impersonation is checked (enabled).
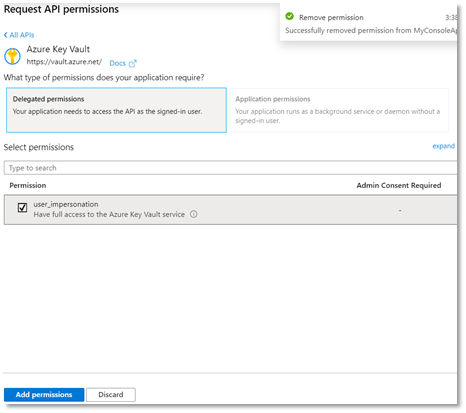
- Click Add permission
Azure Key Vault – create and setup (access policy)
The following procedure will guide you on to create a Key Vault in Azure and setup the access policy to allow our application.
- Sign-in to Azure Portal.
- Search and click Key Vault.
- Click +Add. Create key vault form loads.
- Populate the following
- Subscription – select your preferred subscription.
- Resource group – select your preferred subscription.
- Key vault name – give a name or a prefix to identify that it is a key vault.
- Region – select the appropriate region.
- Pricing Tier – Standard or update as necessary.
- Soft-delete – set to default
- Retention period (days) – set to default.
- Purge protection – set to default.
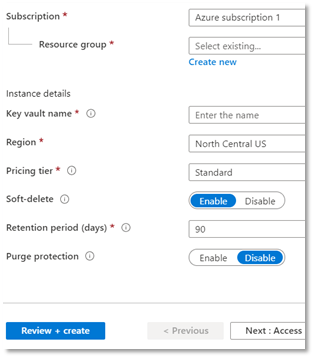
- Click Review + create.
- Click Create. It will take a few minutes to create the resources.
- Once created, click your new key vault.
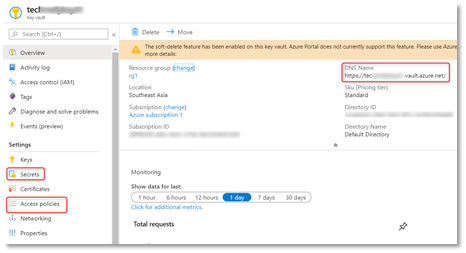
**NOTE** Save the DNS Name – that is your key vault url.
- Click Secrets
Secrets are designed to store sensitive information (value) and accessed via key.
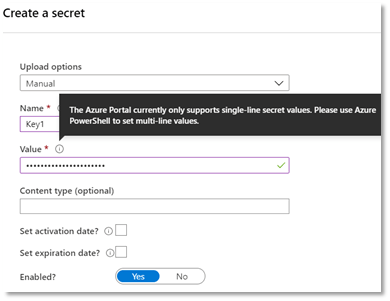
- Click + Generate/Import. Create a secret dialog loads.
- Populate the following:
- Upload Options – Manual (default)
- Name – your key name (take note of this).
- Value – your secret value. This will be mask as you paste/type the characters.
- Content type (optional ) – leave blank
- Enabled? Yes (default)
**NOTE** In the “value”, the Azure Portal currently only supports single-line secret values. Please use Azure PowerShell to set multi-line values.
- Click Create
- Once created, click the latest version.
- Click the latest version. Secret Version form loads.
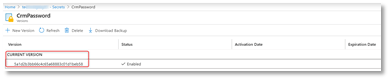
- Click Show Secret Value
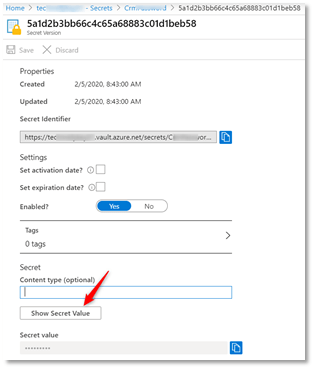
**NOTE** If you want to update the value of the secret, you have click the new version.
Setup Key Vault Access Policy
The access policy defines the (a) principal and the (b) privilege for the key vault. In this section, we show you how to allow our application register in the 1st section, to access the key vault.
- Sign-in to Azure Portal.
- Search and click Key Vault. List of key vaults loads.
- Click on your key vault. Key Vault form loads.
- Click Access Policies -> +Add Access Policy.

- Populate the following:
- Configure from template – Secret ManagementKey permission – ensure that only Get & List is checked.
- Select principal – search for Application that you registered in App Registration process.
- Configure from template – Secret Management
- Key permission – ensure that only Get & List is checked.
- Select principal – search for Application that you registered in App Registration process.

- Click Add
Sample Code using KeyVaultClient class
The code sample below will demonstrate how to use KeyVaultClient and how it handles the authentication process using client_id and client secret from the application registration process.
<?xml version="1.0" encoding="utf-8" ?>
<configuration>
  <appSettings>
    <add key="KeyVaultUrl" value="https://teXXXXX.vault.azure.net/"/>
    <add key="KeyVaultKey" value="CrmPassword"/>
    <add key="ApplicationId" value="530c1597-XXX-XXXX-XXXX-XXXXXXX1e"/>
    <add key="RedirectUri" value=""/>
    <add key="ClientSecret" value="vSEL/XXXXXX0?W=XXXXXXXG["/>
  </appSettings>
</configuration>
static void Main(string[] args)
{
    try
    {
        var vaultAddr = ConfigurationManager.AppSettings.Get("KeyVaultUrl");
        var httpClient = new HttpClient();
        var kvClient = new KeyVaultClient(new KeyVaultClient.AuthenticationCallback(GetAccessTokenAsync), new HttpClient());

        var secret = kvClient.GetSecretAsync(vaultAddr, "CrmPassword").GetAwaiter().GetResult();

        System.Console.WriteLine($"Secret: {secret}");
    }
    catch (System.Exception ex)
    {
        Console.WriteLine(ex.Message);
        Console.WriteLine(ex.InnerException?.Message);
    }

    System.Console.WriteLine("Results");
    System.Console.ReadLine();
}

private static async Task<string> GetAccessTokenAsync(string authority, string resource, string scope)
{
    System.Console.WriteLine("GetAccessTokeynAsync");
    var clientId = ConfigurationManager.AppSettings["ApplicationId"];
    var clientSecret = ConfigurationManager.AppSettings["ClientSecret"];
    ClientCredential clientCredential = new ClientCredential(clientId, clientSecret);

    var context = new AuthenticationContext(authority, TokenCache.DefaultShared);
    var result = await context.AcquireTokenAsync(resource, clientCredential);

    return result.AccessToken;
}

Leave a comment